User Guide
DevPlan Pro User Guide
Welcome to the user guide for our CLI-based project management application! This tool is designed to streamline your project organization and task management, all from the command line interface. With a range of features tailored to enhance efficiency and collaboration, you can easily create, update, and monitor your projects and tasks.
Table of Contents
- Tips on using this User Guide
- Quick start
-
Features
- Adding a project:
add project - Deleting a project :
delete project - Show Project :
show project - Add task :
add task - Delete task :
delete task - Set deadline to project :
set deadline - Set deadline to task :
set deadline - Set Project Status :
set status - Set Task Status :
set status - Assign team to project:
assign team - Add member to project :
add person - Remove member from project :
delete person - Assign member to task :
assign person - Rename a project:
set name - Rename a task:
set name - Set project category:
set category - Filter projects by category:
filter category - Add comments to project:
add comment - Locating projects by name:
find project - Listing all projects:
list project - Clear project list:
clear project - Show help:
show help - Exit DevPlan Pro:
exit program
- Adding a project:
- FAQ
- Known issues
- Command summary
Tips on using this User Guide
- Follow the Quick start to get DevPlan Pro set up on your device.
- Check out the detailed command list from the Features section.
- For get to a more specific command or section quickly, click the corresponding section in the Table of Contents
- If you are finding unexpected behaviors in the UI or the app itself, try checking out the FAQ or the Known issues section.
Quick start
-
Ensure you have Java
11or above installed in your Computer. -
Download the latest
[CS2103T-W08-4][DevPlanPro].jarfrom here. -
Copy the file to the folder you want to use as the home folder for your app.
-
Open a command terminal,
cdinto the folder you put the jar file in, and use thejava -jar [CS2103T-W08-4][DevPlanPro].jarcommand to run the application.
A GUI similar to the below should appear in a few seconds. Note how the app contains some sample data.
 Some notes about the UI:
- On the top left is the menu bar. There are 2 buttons: File and Help. File can be used as an alternative way to exit the app, and Help is used to open up the help window.
- Below the menu bar is the command box. This is where you will be typing the commands to use the app. See 5. for more details.
- Below the command box is the result box. In the Features section the “expected result” of each commands will be stated. Those results are expected to be displayed here in this result box.
- Below the result box is the project list. This is where your projects will appear after you’ve added them.
- Now on the right side is the details of the project. To choose which project you would like to see the details, use the show project command.
⚠️ If you are finding unexpected behaviors in the UI or the app itself, try checking out the FAQ or the Known issues sections of this User Guide.
-
Type the command in the command box and press Enter to execute it. Some example commands you can try:
-
add project Duke: Adds a project namedDuketo the project list. -
delete project Duke: Deletes the Duke project from the project list. -
clear project: Deletes all projects and tasks. -
exit program: Exits the app.
-
-
Refer to the Features section below for details of each command.
Features
![]() Notes about the commands:
Notes about the commands:
-
Words in
<UPPER_CASE>are the parameters to be supplied by you, the user.
e.g. inadd project <PROJECT_NAME>,<PROJECT_NAME>is a parameter which can be used asadd project CS2103. -
Extraneous parameters for commands that do not take in parameters (namely
list project) will be ignored.
e.g. if the command specifieslist project 123, it will be interpreted aslist project. -
If you are using a PDF version of this document, be careful when copying and pasting commands that span multiple lines as space characters surrounding line-breaks may be omitted when copied over to the application.
Adding a project: add project
The added projects will appear on the project list on the left.
Format: add project <PROJECT_NAME>
⚠️ Warning: Project name needs to be unique.
⚠️ Warning: Project name is alphanumeric: slashes, commas, or any other punctuation mark aren’t accepted.
⚠️ Warning: A long project name can result in incomplete display of the project name, status, and category. To see more text, you can resize the window horizontally or maximize the window.
Examples:
add project CS2103T Duke Chatbot Projectadd project CS2101 Presentation
Expected output:
- Success:
<PROJECT_NAME> has been added to the project list. - Failure:
Project <PROJECT_NAME> already exists.Project name should be alphanumerical and not empty.
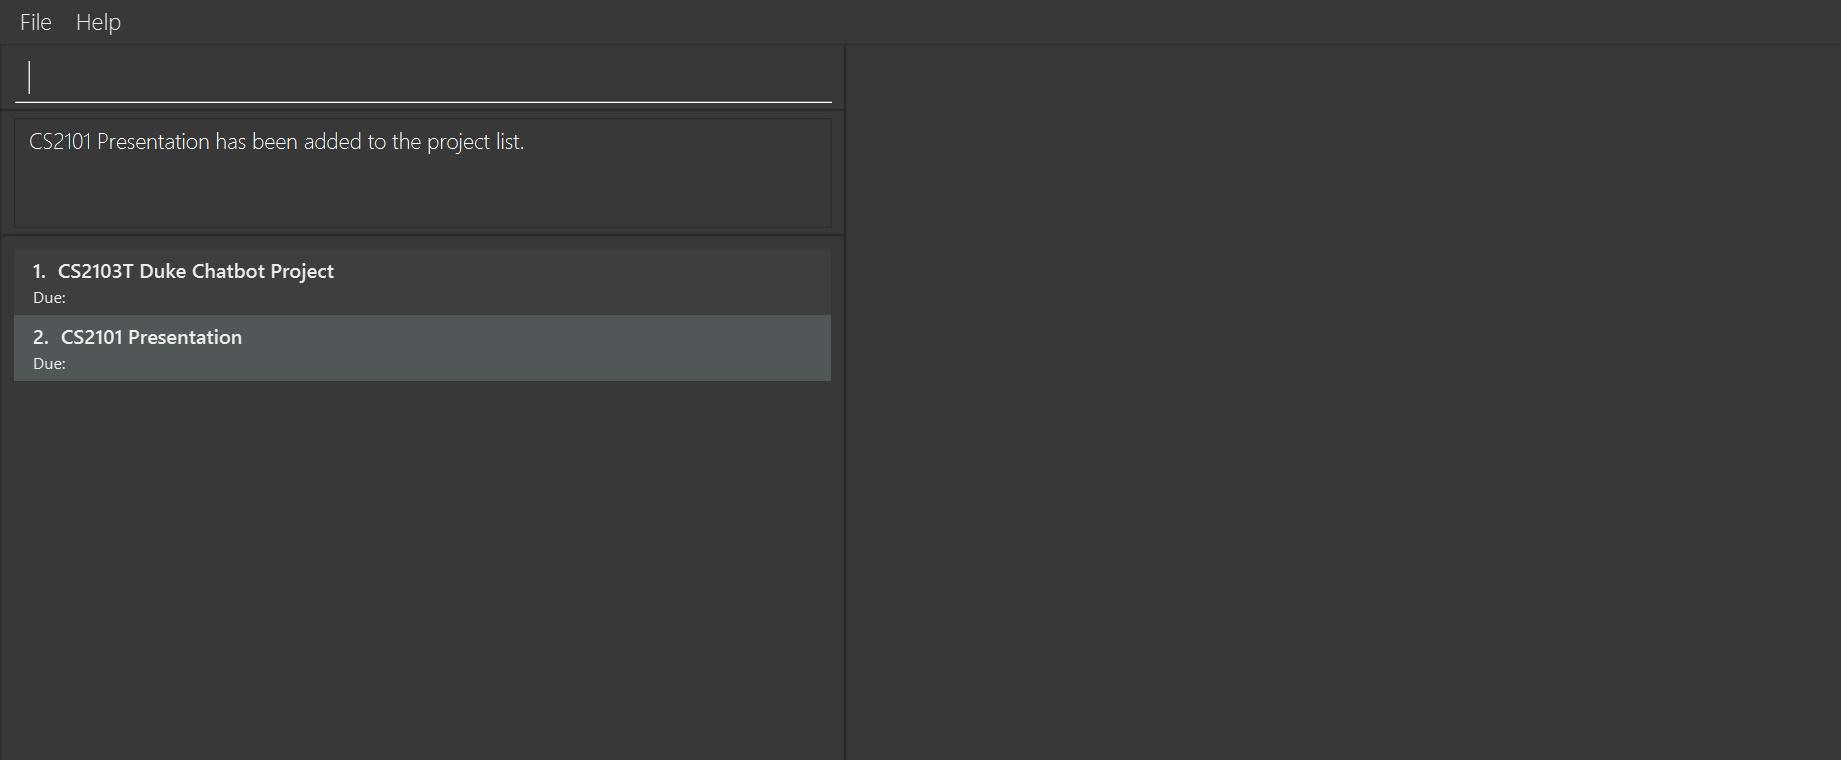 Description: An example of the result after executing the “add project” command.
Deleting a project : delete project
Format: delete project <PROJECT_NAME>
⚠️ Warning: The project to be deleted must exist.
Examples:
delete project CS2101 Presentation
Expected output:
- Success:
<PROJECT_NAME> has been deleted from the project list. - Failure:
Project <PROJECT_NAME> not found: Please make sure the project exists.Project name should be alphanumerical and not empty.
Show Project : show project
Sets the current showing project as the specified project.
⚠️ Warning: The specified project must be in the current project list. Try using list project before using this command if you couldn’t see your project in the current project list.
Format: show project <PROJECT_NAME>
Examples:
show project CS2101 Presentation
Expected output:
- Success: The UI now shows the project’s information.
- Failure:
Project <PROJECT_NAME> not found: Please make sure the project exists.Project name should be alphanumerical and not empty.
 Description: An example of the result after executing the “show project” command, displaying project information in the UI.
Add task : add task
Adds the specified task to a project.
Format: add task <TASK_NAME> /to <PROJECT_NAME>
⚠️ Warning: The specified project must exist.
⚠️ Warning: Task name has to be unique within the project.
⚠️ Warning: Task name is alphanumeric: slashes, commas, or any other punctuation mark aren’t accepted.
⚠️ Warning: Task name should be within 30 characters long. A longer name can result in incomplete display (see known-issues).
Examples:
add task Prepare slides for presentation /to CS2101 Presentation
Expected output:
- Success:
<TASK_NAME> has been added to <PROJECT_NAME>. - Failure:
Project <PROJECT_NAME> not found: Please make sure the project exists.Task <TASK_NAME> already exists in <PROJECT_NAME>.Names should be alphanumerical and not empty.Invalid command format! add task TASK_NAME /to PROJECT_NAME
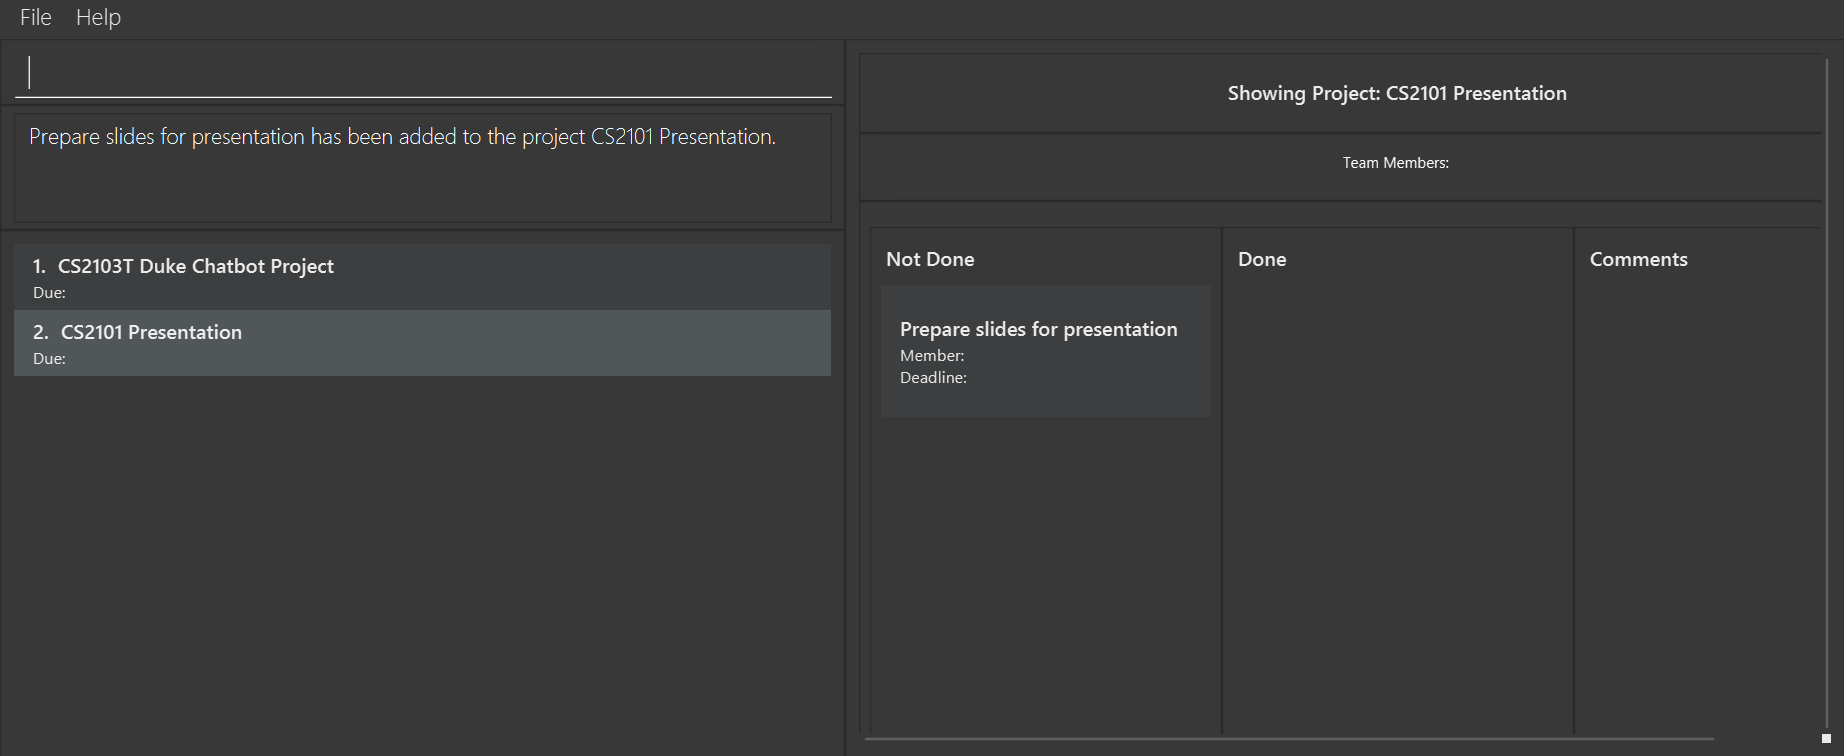
Delete task : delete task
Deletes the specified task from a project.
Format: delete task <TASK_NAME> /in <PROJECT_NAME>
⚠️ Warning: The specified project must exist.
⚠️ Warning: The specified task must exist.
Examples:
delete task Prepare slides for presentation /in CS2101 Presentation
Expected output:
- Success:
<TASK_NAME> has been deleted from <PROJECT_NAME>. - Failure:
Project <PROJECT_NAME> not found: Please make sure the project exists.Task <TASK_NAME> not found: Please make sure the task exists.Names should be alphanumerical and not empty.Invalid command format! delete task TASK_NAME /in PROJECT_NAME
Set deadline to project : set deadline
Format: set deadline <DEADLINE> /to <PROJECT_NAME>
⚠️ Warning: The specified project must exist.
⚠️ Warning: The deadline must be in the Mmm DD YYYY format.
⚠️ Warning: This deadline is considered a separate deadline from the task deadline; there will be no checks to make sure the tasks are dued before the project.
Examples:
set deadline Feb 25 2024 /to CS2103_TP
Expected output:
- Success:
The project <PROJECT_NAME> has been set with the following deadline <DEADLINE>. - Failure:
The deadline <DEADLINE> has been entered in the wrong format. An example of the correct format is Mar 15 2024.Project <PROJECT_NAME> not found: Please make sure the project exists.Please enter valid date.Names should be alphanumerical and not empty.
Set deadline to task : set deadline
Format: set deadline <DEADLINE> /to <TASK_NAME> /in <PROJECT_NAME>
⚠️ Warning: The specified project must exist.
⚠️ Warning: The specified task must exist.
⚠️ Warning: The deadline must be in the Mmm DD YYYY format.
⚠️ Warning: This deadline is considered a separate deadline from the project deadline; there will be no checks to make sure the tasks are dued before the project.
Examples:
set deadline Feb 25 2024 /to submit feature list /in CS2103_TP
Expected output:
- Success:
Deadline <DEADLINE> has been assigned to <PROJECT_NAME>:<TASK_NAME>. - Failure:
The deadline <DEADLINE> has been entered in the wrong format. An example of the correct format is Mar 15 2024Project <PROJECT_NAME> not found: Please make sure the project exists.Task <TASK_NAME> not found: Please make sure the task exists.Please enter valid date.Names should be alphanumerical and not empty.Invalid command format! set deadline DEADLINE /to TASK_NAME /in PROJECT_NAME
Set Project Status : set status
Projects set as complete will have a green complete status text beside its name. New projects are initially set as incomplete.
Format: set status <STATUS> /of <PROJECT_NAME>
⚠️ Warning: The specified project must exist.
⚠️ Warning: The status can only be complete or incomplete.
Examples:
set status complete /of CS2103T Duke Chatbot Project
Expected output:
- Success:
Project <PROJECT_NAME> is set as <STATUS>. - Failure:
Project <PROJECT_NAME> not found: Please make sure the project exists.Please enter a valid status: complete/incomplete.Names should be alphanumerical and not empty.
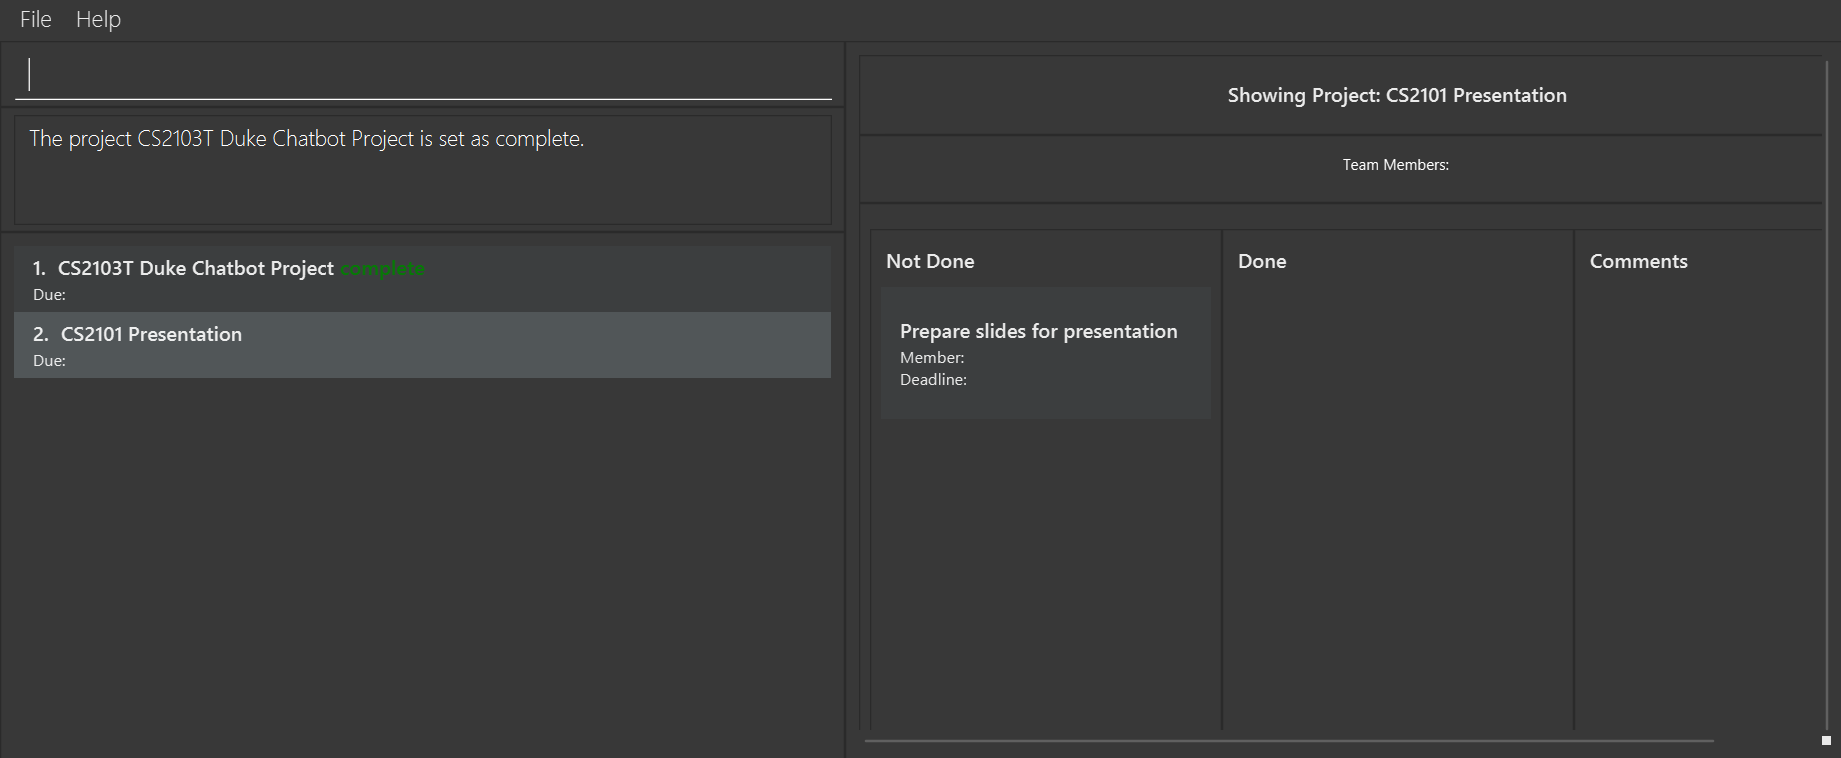
Set Task Status : set status
Tasks set as complete will me moved to the Done column on the right side of the ui. New tasks are initially set as incomplete.
⚠️ Warning: The specified project must exist.
⚠️ Warning: The specified task must exist.
⚠️ Warning: The status can only be complete or incomplete.
Format: set status <STATUS> /of <TASK_NAME> /in <PROJECT_NAME>
Examples:
set status complete /of Prepare slides for presentation /in CS2101 Presentation
Expected output:
- Success:
Task <TASK_NAME> is set as <STATUS>. - Failure:
Task <TASK_NAME> not found: Please make sure the task exists.Project <PROJECT_NAME> not found: Please make sure the project exists.Please enter a valid status: complete/incomplete.Names should be alphanumerical and not empty.Invalid command format! set status [complete/incomplete] /of TASK_NAME /in PROJECT_NAME
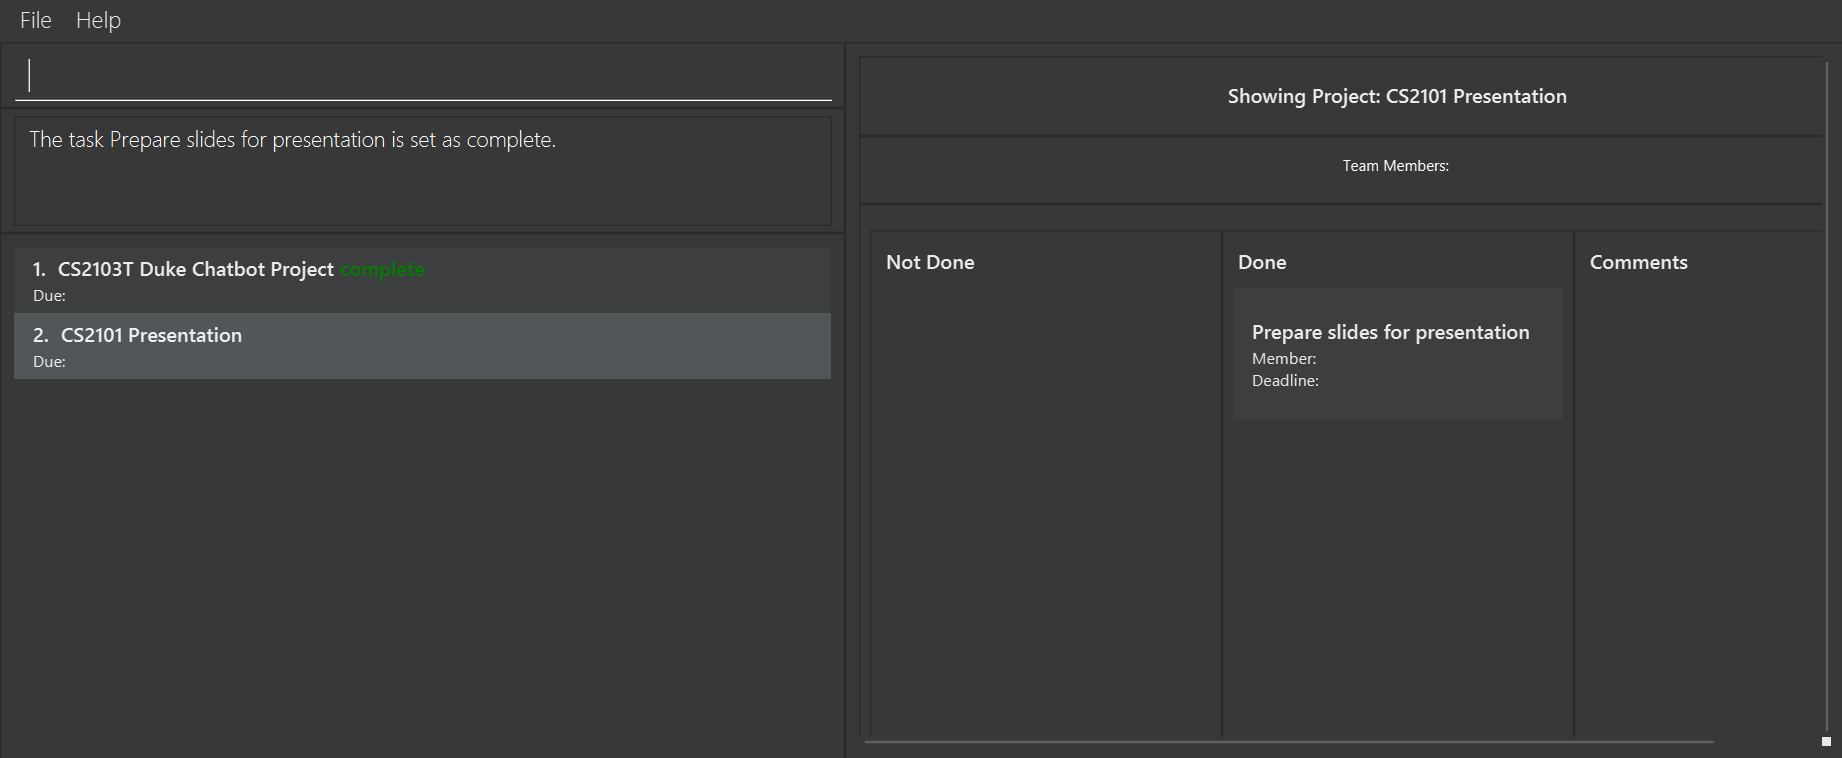
Assign team to project: assign team
Format: assign team <PERSON_NAME_1>[, <PERSON_NAME_2>, <PERSON_NAME_3>, ...] /to <PROJECT_NAME>
⚠️ Warning: The specified project must exist.
🔔 Warning: Each person name cannot be empty.
⚠️ Warning: This will override the current member list of the project; if Joe and Linda were members of project CS2103 before assign team Paul /to CS2103 is called, Joe and Linda will be removed from the project.
⚠️ Warning: Duplicate person names are allowed, but not recommended. It can cause confusion for both you and the app.
⚠️ Warning: Each person name is alphanumeric: slashes, commas, or any other punctuation mark aren’t accepted.
🔔 Note: The part of the format in [ ] is optional
⚠️ Warning: Each person name should be within 25 characters long. A longer name can result in incomplete display (see known-issues).
Examples:
assign team Joe, Cody /to CS2103_TP
Expected output:
- Success:
The team <PERSON_NAME_1>[, <PERSON_NAME_2>, <PERSON_NAME_3>, ...] has been added to <PROJECT_NAME> - Failure:
Project <PROJECT_NAME> not found: Please make sure the project exists.Names should be alphanumerical and not empty.Please enter the project and team fields.Invalid command format! assign team PERSON_NAME, PERSON_NAME, PERSON_NAME /to PROJECT_NAME
Add member to project : add person
Format: add person <PERSON_NAME> /to <PROJECT_NAME>
⚠️ Warning: The specified project must exist.
⚠️ Warning: Duplecate person names are allowed, but not recommended. It can cause confusion for both you and the app.
⚠️ Warning: Person name is alphanumeric: slashes, commas, or any other punctuation mark aren’t accepted.
⚠️ Warning: Person name should be within 25 characters long. A longer name can result in incomplete display (see known-issues).
Examples:
add person Joe /to CS2103_TP
Expected output:
- Success:
The person <PERSON_NAME> has been assigned to the following project <PROJECT_NAME> - Failure:
Project <PROJECT_NAME> not found: Please make sure the project exists.Please enter the member and project fields.Names should be alphanumerical and not empty.Invalid command format! add person /to PROJECT_NAME
Remove member from project : delete person
Format: delete person <PERSON_NAME> /in <PROJECT_NAME>
⚠️ Warning: The specified project must exist.
⚠️ Warning: The specified person must exist in the project.
⚠️ Warning: Removing duplicate name will only remove the first instance of the name.
Examples:
delete person Joe /in CS2103_TP
Expected output:
- Success:
<PERSON_NAME> has been deleted from <PROJECT_NAME> - Failure:
Project <PROJECT_NAME> not found: Please make sure the project exists.Member <PERSON_NAME> not found: Please make sure the person exists in project <PROJECT_NAME>.Names should be alphanumerical and not empty.Invalid command format! delete person PERSON_NAME /in PROJECT_NAME
Assign member to task : assign person
Format: assign person <PERSON_NAME> /to <TASK_NAME> /in <PROJECT_NAME>
⚠️ Warning: The specified project must exist.
⚠️ Warning: The specified task must exist in the project.
⚠️ Warning: The specified person must exist in the project.
⚠️ Warning: Only the latest member will be assigned to the task; Using assign person Joe /to unit test /in CS2103_TP before assign person Paul /to unit test /in CS2103_TP will result in only Paul being assigned to the task.
Examples:
assign person Joe /to unit test /in CS2103_TP
Expected output:
- Success:
<PERSON_NAME> has been assigned to <PROJECT_NAME>: <TASK_NAME>. - Failure:
Project <PROJECT_NAME> not found: Please make sure the project exists.Task <TASK_NAME> not found: Please make sure the task existsMember <PERSON_NAME> not found: Please make sure the person exists.Please enter the task, project and member fields.Names should be alphanumerical and not empty.Invalid command format! assign person PERSON_NAME /to TASK_NAME/ in PROJECT_NAME
Rename a project: set name
Format: set name <NEW_NAME> /of <PROJECT_NAME>
⚠️ Warning: The specified project must exist.
Examples:
set name f2103 /of CS2103_TP
Expected output:
- Success:
Project <PROJECT_NAME> has been renamed to <NEW_NAME> - Failure:
Project <PROJECT_NAME> not found: Please make sure the project exists.Project <PROJECT_NAME> already exists: Please set the name of the project to be unique.Names should be alphanumerical and not empty.
Rename a task: set name
Format: set name <NEW_NAME> /of <TASK_NAME> /in <PROJECT_NAME>
⚠️ Warning: The specified project must exist.
⚠️ Warning: The specified task must exist in the project.
Examples:
set name fix UG bugs /of fix IG bugs /in CS2103_TP
Expected output:
- Success:
Task <NEW_NAME> of project <PROJECT_NAME> has been renamed to <TASK_NAME> - Failure:
Project <PROJECT_NAME> not found: Please make sure the project exists.Task <TASK_NAME> not found: Please make sure the task exists in project <PROJECT_NAME>Task <TASK_NAME> already exists. Please set the name of the task in project %2$s to be unique.Names should be alphanumerical and not empty.Invalid command format! set name NEW_TASK_NAME /of TARGET_TASK_NAME /in PROJECT_NAME
Set project category: set category
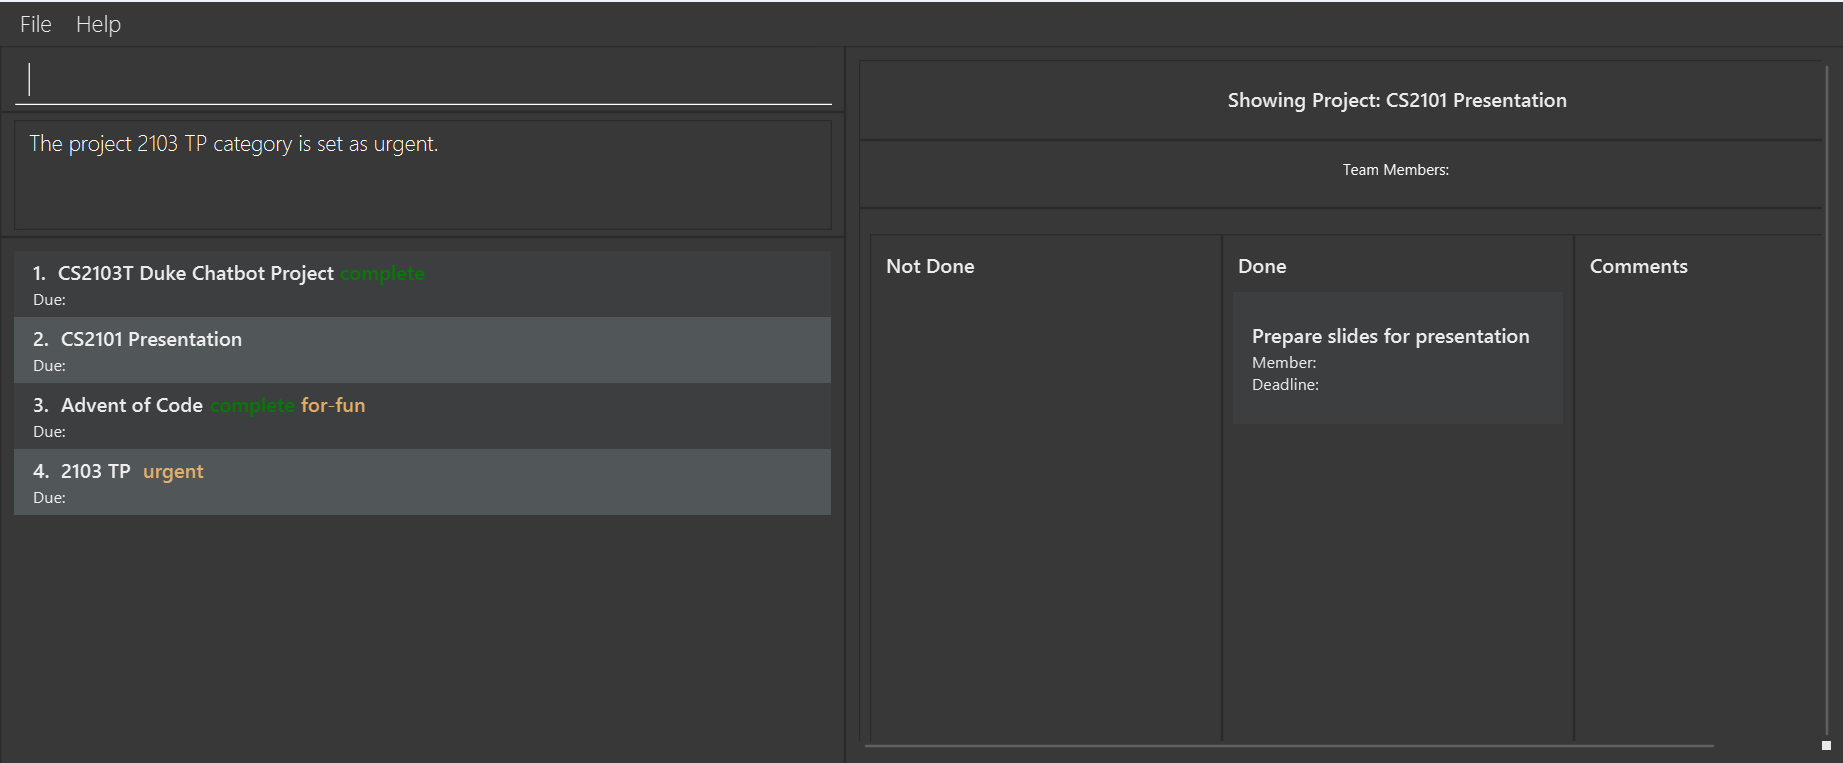
Similar to adding a tag to the project. The category will be shown as the orange text beside the project’s name (it comes after the project status).
Format: set category <CATEGORY> /to <PROJECT_NAME>
⚠️ Warning: The specified project must exist.
⚠️ Warning: Each project is limited to one category. Setting a new category overrides the old one.
⚠️ Warning: A long category can result in incomplete display of the project name, status, and category. To see more text, you can resize the window horizontally or maximize the window.
Examples:
set category urgent /to 2103 TP
Expected output:
- Success:
The project <PROJECT_NAME> category is set as <CATEGORY>. - Failure:
Project <PROJECT_NAME> not found: Please make sure the project exists.Names should be alphanumerical and not empty.Please enter the category.Invalid command format! set category CATEGORY /to PROJECT_NAME
Filter projects by category: filter category
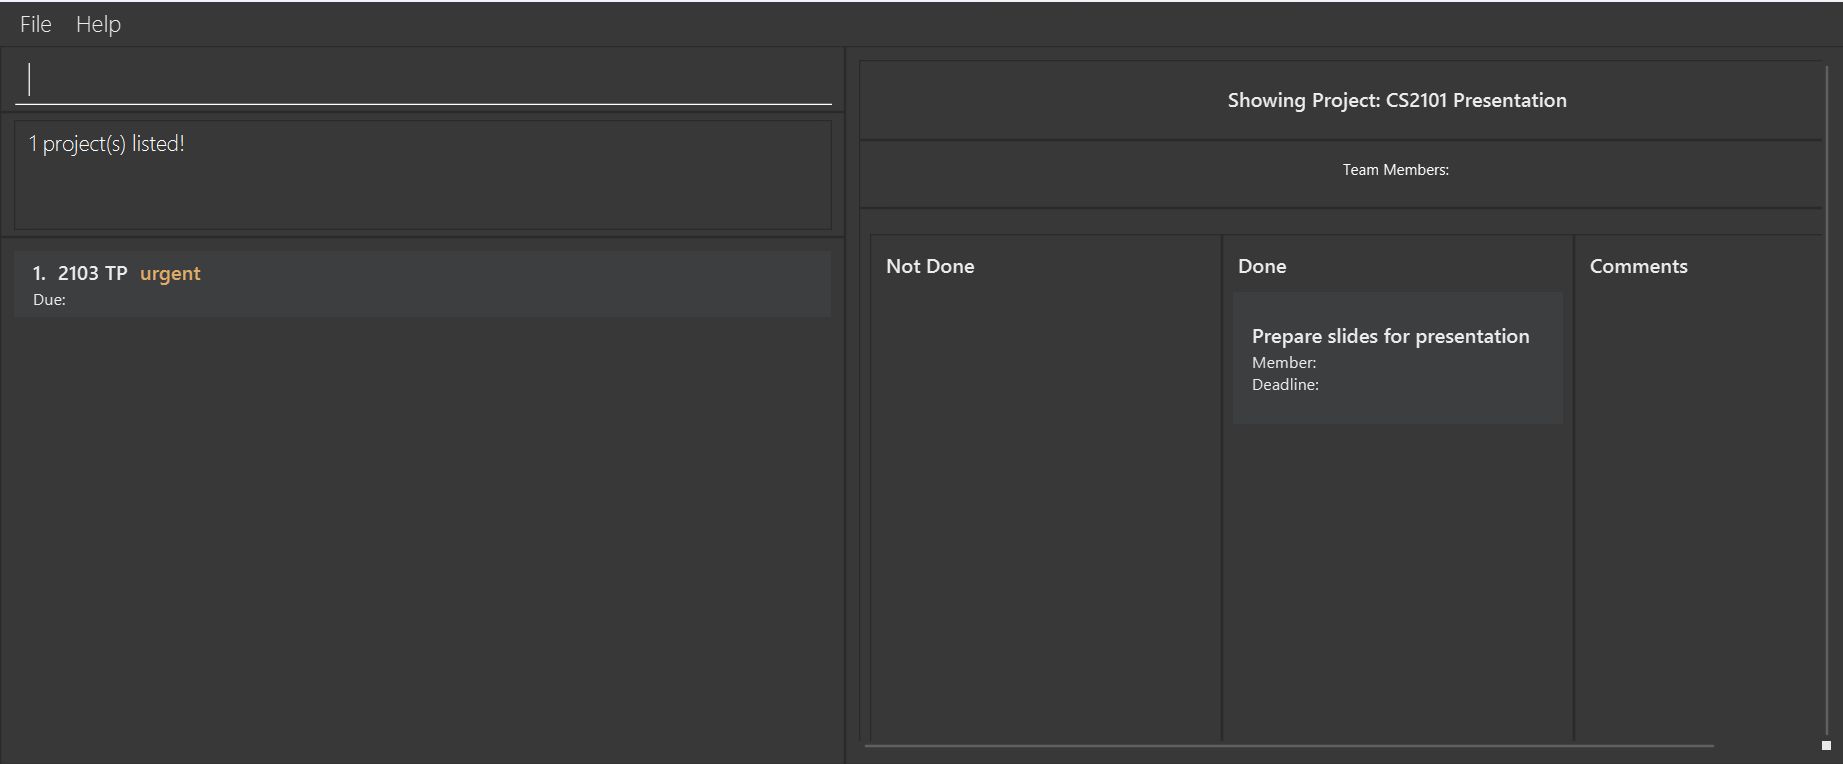
Format: filter category <CATEGORY>
Examples:
filter category urgent
Expected output:
The project list will list the projects with the specified category.
Add comments to project: add comment
Format: add comment <COMMENT> /from <MEMBER_NAME> /to <PROJECT_NAME>
⚠️ Warning: The specified project must exist.
⚠️ Warning: The specified member must exist in the project.
⚠️ Warning: The comments will not be deleted even if the person who made the comment is removed from the project.
Examples:
add comment delete task can only be started after add task is implemented /from Mary /to 2103
Expected output:
- Success:
The comment <COMMENT> has been added to the project <PROJECT_NAME>. - Failure:
Project <PROJECT_NAME> not found: Please make sure the project exists.Team member <MEMBER_NAME> not found: Please make sure the person exists.Please enter a comment.Names should be alphanumerical and not empty.Invalid command format! add comment /from PERSON_NAME /to PROJECT_NAME
Locating projects by name: find project
Finds projects whose names contain any of the given keywords. The updated project list will show the projects that matches. To see the full project list, use list project command.
Format: find project [KEYWORDS]
Examples:
find project CS2103
Expected output:
- The project list will list the projects containing the specified keyword(s).
Listing all projects: list project
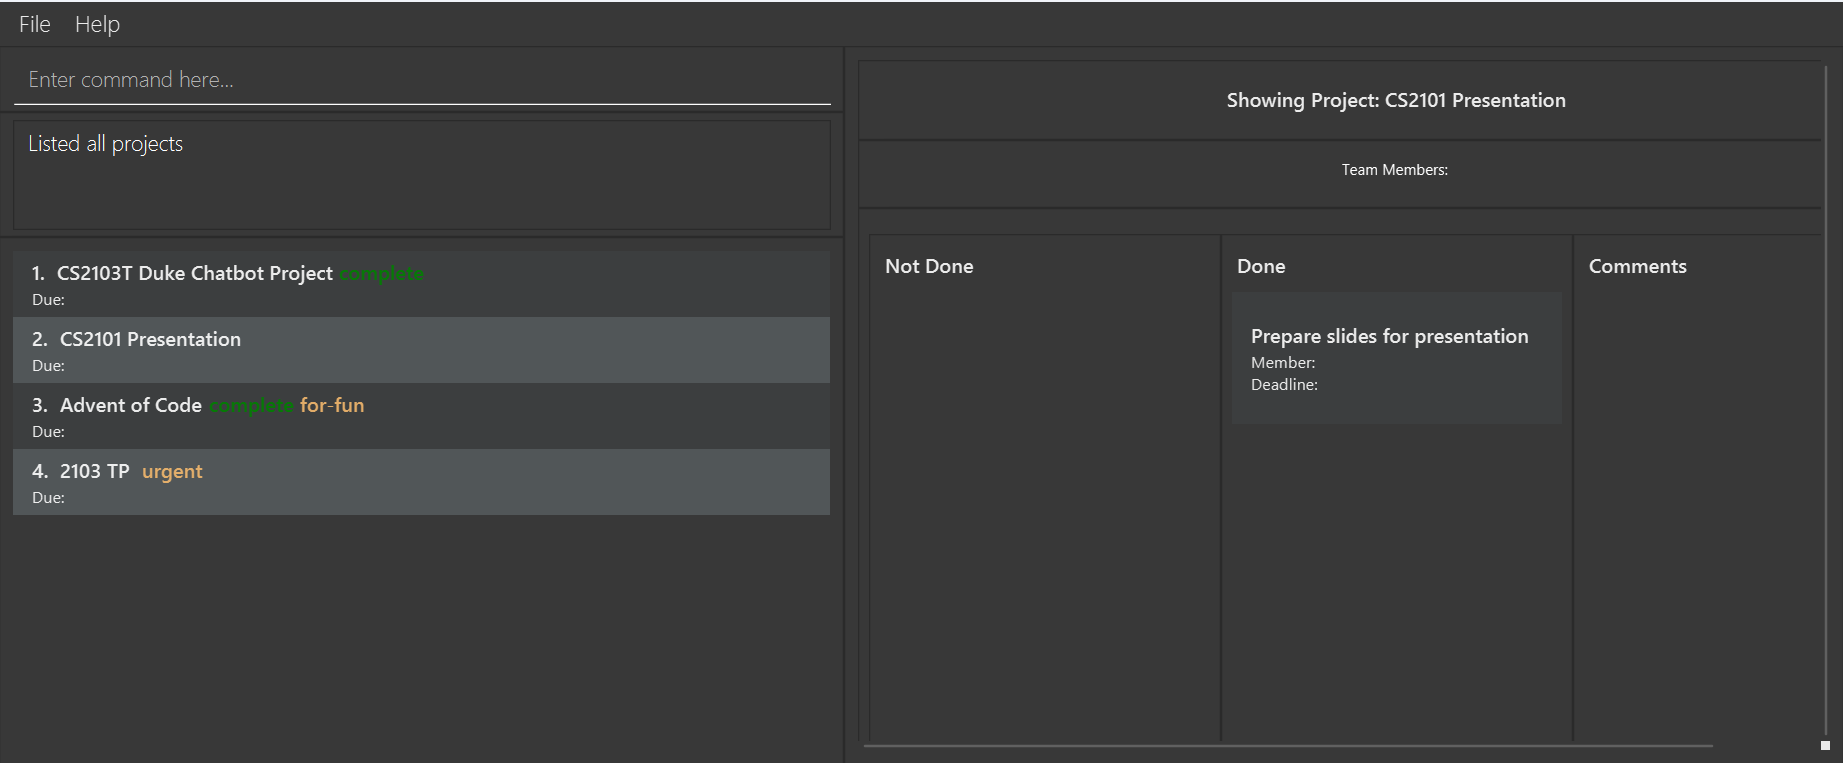
Shows a list of all projects in the project list.
Format: list project
Clear project list: clear project
Clears the project list, making the project list empty.
Format: clear project
Show help: show help
Opens a help window containing the url to this user guide.
Format: show help
Exit DevPlan Pro: exit program
Format: exit program
FAQ
Q: How do I transfer my data to another Computer?
A: Install the app in the other computer and overwrite the empty data file it creates with the file that contains the data of your previous DevPlan Pro home folder.
Known issues
-
When using multiple screens, if you move the application to a secondary screen, and later switch to using only the primary screen, the GUI will open off-screen. The remedy is to delete the
preferences.jsonfile created by the application before running the application again. -
When viewing tasks in the UI, if the name of the task is longer than 30 characters, the UI will not be able to display the full name of the task. A similar limit of 25 characters is applied to the name of the member set to the task.
Command summary
| Action | Format, Examples |
|---|---|
| Add project |
add project <PROJECT_NAME> Example: add project CS2101 Presentation
|
| Delete project |
delete project <PROJECT_NAME> Example: delete project CS2101 Presentation
|
| Add task |
add task <TASK_NAME> /to <PROJECT_NAME> Example: add task Prepare slides for presentation /to CS2101 Presentation
|
| Delete task |
delete task <TASK_NAME> /in <PROJECT_NAME> Example: delete task Prepare slides for presentation /in CS2101 Presentation
|
| Show Project |
show project <PROJECT_NAME> Example: show project CS2101 Presentation
|
| Set deadline to project |
set deadline <DEADLINE> /to <PROJECT_NAME> Example: set deadline Feb 25 2024 /to CS2103_TP
|
| Set deadline to task |
set deadline <DEADLINE> /to <TASK_NAME> /in <PROJECT_NAME> Example: Set deadline Feb 25 2024 /to submit feature list /in CS2103_TP
|
| Set Project Status |
set status <STATUS> /of <PROJECT_NAME> Example: set status complete /of CS2103T Duke Chatbot Project
|
| Set Task Status |
set status <STATUS> /of <TASK_NAME> /in <PROJECT_NAME> Example: set status complete /of unit test /in CS2103T Duke Chatbot Project
|
| Assign team to project |
assign team <PERSON_NAME_1>[, <PERSON_NAME_2>, <PERSON_NAME_3>, ...] /to <PROJECT_NAME> Example: assign team Joe, Cody /to CS2103_TP
|
| Add member to project |
add person <PERSON_NAME> /to <PROJECT_NAME> Example: add person Joe /to CS2103_TP
|
| Remove member from project |
delete person <PERSON_NAME> /in <PROJECT_NAME> Example: delete person Joe /in CS2103_TP
|
| Assign member to task |
assign person <PERSON_NAME> /to <TASK_NAME> /in <PROJECT_NAME> Example: assign person Joe /to unit test /in CS2103_TP
|
| Rename a project |
set name <NEW_NAME> /of <PROJECT_NAME> Example: set name f2103 /of CS2103_TP
|
| Rename a task |
set name <NEW_NAME> /of <TASK_NAME> /in <PROJECT_NAME> Example: set name assign person command /of add person command /in CS2103_TP
|
| Set project category |
set category <CATEGORY> /to <PROJECT_NAME> Example: set category urgent /to 2103
|
| Filter projects by category |
filter category <CATEGORY> Example: filter category urgent
|
| Add comments to project |
add comment <COMMENT> /from <MEMBER_NAME> /to <PROJECT_NAME> Example: add comment delete task can only be started after add task is implemented /from Mary /to 2103
|
| Locating projects by name |
find project [KEYWORDS] Example: find project CS2103
|
| Listing all projects | list project |
| Clear project list | clear project |
| Show help | show help |
| Exit DevPlan Pro | exit program |